
In January of this year I started my first bullet journal and I love it, but I found it annoying that I was always losing my pen. To remedy the situation I decided to make a cover for it and add a pocket.
I bought a new sewing machine a couple of weeks ago, so I thought to use this as my “get to know my new machine” project. I’m naming the new machine Vera after my grandmother who used to sew and quilt, and I finally got to plug her in on Monday and test her out!
This is what my journal looked like before I started out. I love the original colour so when I looked for material, I looked for something similar. As you can see, the journal has an elastic closure, which I had hoped to be able to use, however, I’m not the most fantastic pattern maker so it didn’t quite work out. In fact, the whole design didn’t quite work out as planned, but I adapted and now I have a better idea what to do the next time.


I used the better part of 2 fat quarters to make my cover. For the main piece I cut 2 pieces of the turquoise 17 3/4-inches x 8 3/4-inches. For the pocket, I cut two 5 1/2-inch x 5 1/2-inch squares. For a little padding,without a lot of bulk, I cut white flannel in the same dimensions as the cover and the pocket.

I layered the pieces with the flannel on the bottom against the wrong side of one of the pieces of fabric. The other piece of fabric was placed on top with right sides of the fabric facing. In both cases I stitched a 1/4-inch seam around. For the pocket, I only sewed three sides, then clipped the corners a bit before turning the pocket. I then folded the top of the material in and top stitched the top closed.
For the main piece of the cover, I stitched almost all the way around, and left a few inches at the bottom open. (I left it open at the front, I probably should have left the back or one of the sides which would have been hidden on the inner flaps, but live and learn.) Again, I clipped the corners, and turned the cover right side out before top stitching it closed very close to the edge.
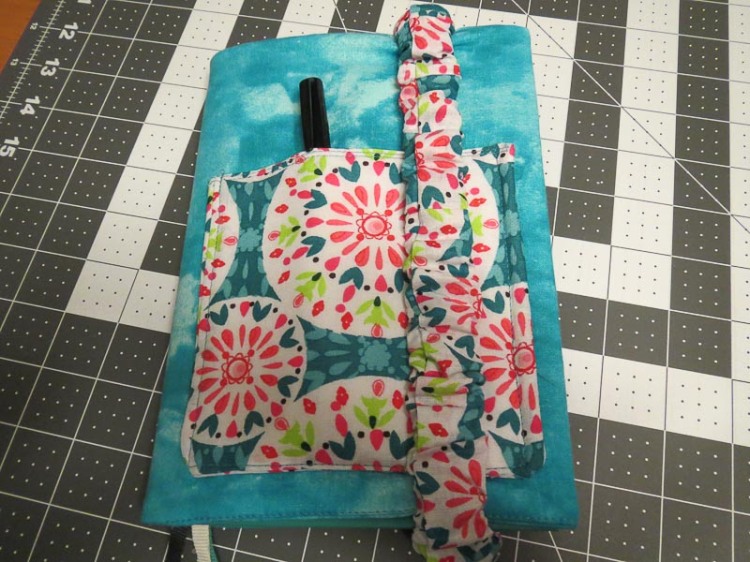
I wrapped the cover around my journal to figure out where to place the pocket, then I top stitched 3 sides of the pocket to the front of the cover, leaving the top open.

Initially, I had planned to sew the flaps on either side closed for the journal cover to slip into, however I didn’t leave enough after including the seam allowance so the cover was exactly the size of my journal. Instead, I used 3/4-inch wide elastic, and cut 4 pieces approximately 1-inch to 1 1/4-inch long. I wrapped the cover around my journal again, and used pins to mark where I wanted to place the elastics. I hand stitched the elastics slightly below the top so that the cover would fit snugly to my journal.

(Forgive me for the lack of pictures for the next few steps)
For the elastic closure, I wrapped a piece of 3/4-inch elastic all the way around my journal, stretching it slightly and made sure to overlap approximately 1 inch before cutting it. I wanted a bit of a ruffled look for the cover on the elastic, so I cut 2 3-inch wide strips and sewed them together end to end so that they made one strip just a little less then twice the length of the elastic. I folded the strip in half, with right side facing, and stitched the other side closed to create a tube.
After creating the tube, I turned it so that the right side of the fabric was on the outside, then threaded the elastic through it. I sewed the elastic together, overlapping approximately one inch, and sewing in three spots to going back and forth about 3 times to make sure it would hold. Then I turned the ends of the fabric tube in approximately 1/4 inch, closed the gap between the ends, tucking one end slightly inside the other, then stitched the tube closed. I tried to make sure that my closing stitches were on top of the stitching on the encased elastic.
When I started out, I had planned to make the flap on the back narrower so that I could use the built in elastic. and to that end, I had cut notches in the back of the fabric to fit it around the elastic. Unfortunately, that plan didn’t work out so when you look at the back you can see the notches for the original elastic. Luckily I had cut the fabric a little larger so I was able to make the back flap a little more substantial. The next time, I’ll skip the notches and make my own closure as I did for this one.


Once the elastic piece was ready, I placed it on the journal, and marked where I wanted it sewn to the back. Making sure that the inner flap was out of the way, sewed the elastic to the back, again sewing over the closure of the tube. and that’s it! I have a fantastic cover for my bullet journal, and a pocket to hold a few pens so that I’m not always losing them,especially when I carry it in my purse!
Next up I am going to make one for my art journal which is a similar size!
Do you have any tips for making a pattern like this, or do you wing it like I do and hope for the best? I always start out with good intentions, and then adjust it as I run into problems. Are you good at improvising when necessary?

So pretty and practical!!! 😀
LikeLiked by 1 person
Thanks!
LikeLiked by 1 person
I love that creatives think about solving a problem by making something! For me, the creative process is sometimes more fun than the outcome. Sometimes it’s perfect and sometimes it doesn’t work out or come out as I expect or hope but I still love the process. Whether it works or not, we always learn something for next time. It’s great to see others working through their challenges and solutions. Nice job!
LikeLiked by 1 person
Thank you! You’re right, half the fun is in coming up with the idea, and then trying to implement it, no matter what the results are in the end.
LikeLiked by 1 person
Such a cute and practical idea 😊
LikeLiked by 1 person
Thanks!
LikeLiked by 1 person